|
Documentation This document presents Micro Dart Scorer, a project to create a J2ME compliant dart scorer. The development is divided in 3 main parts. At first, there is a core library (mdartscorer-lib) which provides a structure for controlling dart games. On top of the library 2 GUIs were created. A very simple Swing GUI was created to test the library (mdartscorer-swing). The J2ME GUI (mdartscorer-j2me) is a Midp 2.0 compatible GUI that can be installed on any device running Java. The rest of the document is organized as follows: Section 2, “Installation” presents all installation instructions. Although only mdartscorer-j2me installation is really needed, we present instructions to install all the required software and the plugins for extension as well. In Section 3, “Using Micro Dart Scorer J2ME” is an user manual for mdartscorer-j2me GUI. At last, in Section 4, “The Micro Dart Scorer Library” we present the library, explaining the concepts and design decisions and providing hints for using and extending the library. This section presents instructions for installing mdartscorer-j2me. If you already have a Java Virtual Machine (JVM) installed on your device, you can skip to Section 2.2, “Micro Dart Scorer J2ME Installation”. Section 2.1, “IBM Weme Installation” shows how to install IBM's Weme with its JVM on a PDA with Windows Mobile 2003. Unfortunately, installation instructions for other JVMs is outside the scope of this document. The Section 2.3, “Eclipse ME Installation” is useful if you want to use or extend the library. Although Micro Dart Scorer is compatible to any JVM implementation with Midp2.0, it was only tested with IBM Weme (Websphere Everyplace Micro Environment). It is a complete environment for developing J2ME applications. You can download it for testing and (I think) for non-commercial development. None of the development IDEs or applications included in Weme were used while developing mdartscorer (everything was developed in EclipseME). The only part used was the JVM, which seems to be a Test JVM, since only one midlet can run at a time. To install IBM Weme in your PDA with Windows Mobile 2003, follow these steps:
After completing these steps you have a JVM installed in your PDA and you can install Micro Dart Scorer J2ME. After having installed a JVM in your PDA, you can install Micro Dart Scorer J2ME. These instructions will again assume you have installed IBM Weme according to the instructions in Section 2.1, “IBM Weme Installation”. I do not have experience using other JVMs so, if you find out something different in another JVM, please contact me that I write it here. To install Micro Dart Scorer J2ME you have to accomplish only 2 steps. First, you need to copy the files to your PDA. Then, you have either to install the midlet on your JVM or to create a link to run it without installing. The following steps must be followed to copy the needed files to your PDA:
After these steps you must have a folder in your PDA with 2 files: mdartscorer-j2me.jar and mdartscorer-j2me.jad. There are two ways of running mdartscorer-j2me. You can just double click on mdartscorer-j2me.jad and it will call IBM's JVM installer. You just have to let it install the application (accept that I am a trusted person) and then run it. Alternatively, you can create a symbolic link to start the JVM with the midlet. You have to create a text file, edit it (probably on your computer) and copy to the same directory as the other files. A sample link file can be found here. You just have to edit it to reflect both your JVM installation and the path to the folder. Then, you can just double click this link and the application runs. All software included in Micro Dart Scorer was developed using Eclipse Platform. If you want to use or extend the library, we recommend Eclipse together with EclipseME plugin. This section presents briefly how to install and start working with the plugin. For a more detailed explanation, refer to EclipseME plugin website (which is the main source for this section). In order to install Eclipse ME you must have:
You can check EclipseME homepage for a list of supported toolkits. The next section shows how to install Sun's WTK. Sun's Wireless Toolkit can be download direct on Sun's J2ME Wireless Toolkit Download page. Click in "Download" and select the specific file for your platform. The installation is straightforward, just execute the binary file and follow the instructions. There are many ways to install the EclipseME plugin. The following steps must be performed to install it using Eclipse's automated install procedures (in Eclipse 3.1.x):
Eclipse will then download the needed files and install them. You will then be asked to restart the workbench. After restarting, you need to configure EclipseME to use your Wireless Toolkit:
After this procedures you are ready to import source and start developing J2ME applications. If you want to import Micro Dart Score's source code, you have 2 options. First, you can download the source code distributions from the sourceforge website and create Eclipse projects for each module. The second possibility is to checkout the CVS modules. They already contain configured eclipse projects which can be easily imported. In order to get the sources from the CVS server, you can use any CVS Gui or command line tool. The following steps perform the checkout using the CVS command line tool: # cvs -d:pserver:anonymous@cvs.sourceforge.net:/cvsroot/mdartscorer login Logging in to :pserver:anonymous@cvs.sourceforge.net:2401/cvsroot/mdartscorer CVS password: # cvs -d:pserver:anonymous@cvs.sourceforge.net:/cvsroot/mdartscorer co mdartscorer-lib # cvs -d:pserver:anonymous@cvs.sourceforge.net:/cvsroot/mdartscorer co mdartscorer-j2me You don't need to give a password, just press Enter. This will create 2 directories, mdartscorer-lib and mdartscorer-j2me. You can import this 2 modules in Eclipse:
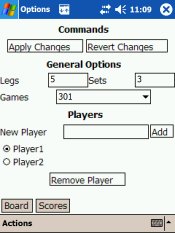
You can repeat this operation with the 2 modules. It will create 2 new projects in your workspace, with the sources for both the J2ME Gui and Library. This section details the usage of Micro Dart Scorer J2ME and it is assumed that you already went through the process of installation as described in Section 2, “Installation”. The midlet is composed of 3 Forms, which I will call Views. The views can be seen in the Screenshots page as well as during this section. The views can be navigated using the small buttons in the bottom. Although there will always be some way to navigate between views, it may differ from one JVM implementation to another. The next subsections will detail the functionalities included in each view. The first thing you see when you start Micro Dart Scorer J2ME midlet is the Options View, as shown in Figure 1, “The Options View”. This View lets you configure the game, in the following aspects:
It is important to understand the concept of this form. You first select all choices you want. At any moment you can press "Revert Changes" and all the changes are discarded. When you are satisfied with your choices, you can press "Apply Changes". This button will start the game (restart it, if you are playing one) with the new options. If press "Revert Changes" after that, nothing will happen (unless you change something after applying). Some more hints in this View:
After configuring the game you click on "Apply Changes" and a new game starts. While playing the game you are going to use the 2 other views, the Board View and the Scores View. The Board View, displayed in Figure 2, “The Board View” is used to mark the throws you made while playing. In the top left corner you can see the player which is currently playing. In the middle is its score, in the format Points/Legs/Sets. In the right corner is displayed the last marked throw, in this case, the Bull's Eye ( a Double 25 ). To mark a new throw, just click on the correct place with your pointer. If you want to mark the zero throw (when you miss the board), you can click in the area around the board). Currently only pointer devices are supported, but there are plans to create another type of interface for the case of devices where pointers are not available. In the bottom of the view there are more commands. The "Tip" command displays a Tip for the next throw, what is useful only when you have the possibility to win the leg in this turn. If you make a mistake and click in the wrong place, you can use "Undo" to correct it. The "Reset" button will start the game again, with the same configurations. In order to have detailed information on the scores, you can go to the Scores View. As you can see in Figure 3, “The Scores View”, this view is very simple, just presenting the current scores in a table. In the moment a new throw is marked the following things can happen:
|
||||||||||
| Copyright © 2005 macacos.org | |||||||||||